JT Custom Builders

We hope you enjoy joining us as we traverse the many aspects of building a new home. While building a new home is one of the most gratifying forms of construction, there’s a significant amount of coordination, and management of several components, including: deliveries, codes, inspections, subcontractors, suppliers, weather, sediment controls, material selections, etc. that can make the process overwhelming and less enjoyable. In this series, we will assume that the Pre-Construction coordination has already been completed. This would include permitting, site plan completion, septic design (if applicable), well drilling (if applicable), etc., etc. We’ll focus on the stages from the stake out of the home through the final inspection. Now, keep in mind, there are plenty of best practices and construction methods that are possible. We will be showing you how we are building this home and some of the tips and tricks that we employ to make it happen. Codes and practices vary from region to region and state to state, so always consult with your local building department and licensed installers to be sure you are adhering to local requirements and practices. In this “episode” you’ll learn things like:
  • What’s a cut sheet?
  • How far below the slab elevation does the excavation actually go?
  • Why are there bolts at the top of the foundation wall?

Stakeout

So what exactly is a stakeout? Put simply, land surveyors are hired to precisely locate the home “in space” on the property. Once they establish where the property actually is, they will locate the new home with hubs

Stakeout

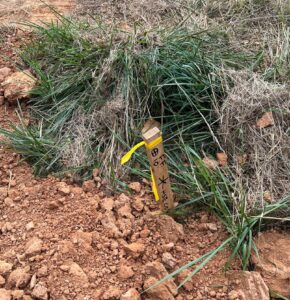
and offset stakes. These are typically wooden stakes with a colored ribbon and markings on the stake. Each hub has a precise elevation (relative to sea level) that helps to determine the overall height of that hub relative to the finished floor elevations of the new home.

For example. If hub #1 is at Elevation 100.00 and the basement floor elevation is to be 96.00, we know that the hub sits 4 feet above the basement floor.

Hubs are placed all around the perimeter of the home, so we can easily establish how much dirt needs to be excavated (or filled in) to create the appropriate elevation.

Once the stakeout is complete and all hubs and stakes are set, a “cut sheet” will be generated and provided by the surveyor to the Builder and/or excavator. This cut sheet compiles the hub elevation data and corresponding “cuts” and “fills” into an easy-to-read list that the Builder and excavator will use to actually dig.

Excavation

Excavation

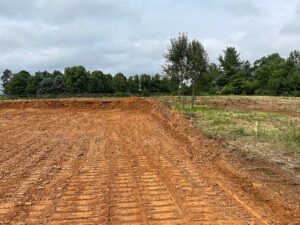
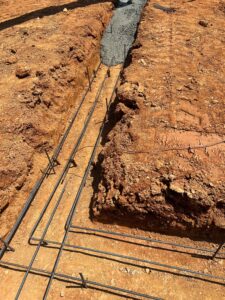
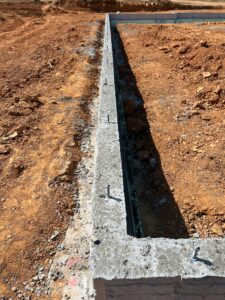
Piggybacking on the stakeout, the excavation is quite literally digging out the earth to create the building pad necessary for construction. Since the stakeout and cutsheet reference the basement elevation (or applicable finished floor height depending on the configuration of the home), the excavator will refer to this to determine exactly where to dig and how deep to go.

In fact, did you know that from the finished slab elevation, the excavation will typically be 8” lower? This is due to the 4” of concrete and 4” of gravel that accompanies most slab placements. The excavation width also is about 3 feet larger than the foundation on all sides which is called an “overdig”. This allows for safe and practical working conditions around the foundation.

Once the excavation is nearing completion, the excavator will use a laser level to confirm the overall building pad is level and to the proper depth all the way around.

Footers and Foundation

Footers
  Footers, or footings, are the base of the home. The footers will be wider than the foundation walls (typically 18” or wider) and 8-12” tall. The BOTTOM of the footer needs to be at “frost depth” which is a geographically determined depth below the top of the ground where the earth will not freeze and move or heave the building (here, it’s 30″). Footers are excavated and in most jurisdictions are inspected by the local jurisdiction. PRIOR to placing the concrete. Remember from the stakeout and excavation sections that the depth of the excavation was established by the approved floor height. It is important that the top of the footer and therefore the top of the foundation wall are determined and set accurately so we ensure the finished floor elevations are accurate.
Foundation wall with anchor bolts
Footers and the foundation walls that sit on top (here we have 18” wide footers with 8” concrete walls on top), are typically designed by the architect or engineer who drafts the plans and will include size and rebar (steel reinforcing bar) size and placement. Our footers here were poured in one day and the following day the foundation walls were formed on top. These forms have an 8″ space for the wall thickness and typically a pump truck is used to place the concrete within the forms. While the wall concrete is still hardening, anchor bolts are placed at a spacing specified by the designer or code. These bolts literally hold the framing down to the foundation wall. There are alternatives to anchor bolts, including straps that wrap around the framing and other approved hold-down devices.
Pump truck in action at our new home build
Within a day or two of pouring the concrete foundation walls, the forms are removed, and we’re ready for the next stages! Interested in learning more about something we’ve touched on here? Drop us a line!

Related Posts

Winter Blues
Winter got you down? Ready for warmer weather? Do you wish your basement was a retreat after a long day or week? Does your kitchen need a facelift before you begin entertaining again?
Building With Us: Your First Contact
So you’ve decided to do it. You’re going to build a new home, expand your home, or finally give your vehicles a cozy place to park. Whether the decision was easy or required much deliberation, it’s a huge step toward completing your project.
Wood
Wood. It’s all around us. Trees, homes, tables, pencils, and so much more. So many topics to discuss regarding wood. We could talk about the structural characteristics of wood. We could talk about sustainability. Price! Shapes. Species. Many, many more. But let’s talk about appearance. Let’s talk about the impact that properly sized, proportioned, and installed wood can have on an interior space.
Scroll to top